

Let’s learn how to make water baths to prevent water from ruining your cheesecake. If you are going to put in the effort to craft a beautiful cheesecake, then you might as well be taking the proper steps to ensure it turns out beautiful.
So my mom (our pastry chef) and another pastry chef got to talking about cheesecakes that this pastry chef had shipped to her for a project. The cheesecakes were vacuumed sealed and shipped from Florida, but when they arrived they were flat and had a grainy mouthfeel.
If you remember from our “Did you know” a few weeks ago [LINK] mouthfeel is the way to describe the smell, taste, temperature, and texture of a bite.
For more research, the other pastry chef had the cheesecake batter shipped to her. She decided to baked off the batter herself to see if the batter was the issue. The cheesecakes were beautiful and the mouthfeel was perfect. This got both of the chefs to start thinking about theorizing on why there was a difference in the product.
Here is their conclusion:
Vacuuming sealing a cheesecake for shipping will remove the air out of the product creating a denser product and an odd mouthfeel.
Let us know in the comments below if you have had a similar experience or a different experience.
As these two chefs were talking about the shipping of cheesecakes, they started talking about the proper way to make cheesecake vs the quick way of making cheesecake. That’s when our chef came to me and said, “let’s talk about the importance of water baths when making a baked cheesecake.”
So here I am sharing with you all some key reminders about baking cheesecakes and how to build a water bath.
Now if you not a baker like me, the words “water bath” sound super complicated, but I am here to tell you that water baths are a simple process that makes a big difference in the final results of your baked cheesecakes.
Related Article: The Importance Of Precision Baking
Baked vs No-Bake Cheesecakes
Now not all cheesecakes will require a water bath. You only need a water bath when you prepare a baked cheesecake. No-bake cheesecakes actually use gelatin in the preparation process.
1 Mistake Of Cheesecake?
Not creating a water bath. Many people take the quick and simple route when making a cheesecake. This can have disastrous results for your beautiful cake. The proper way to bake a beautiful cheesecake is to take the few extra moments and prepare a simple water bath your cheesecake.
Why A Water Bath?
Water baths are needed for custard-based baked products like cheesecakes. The words “water bath” seem like a complicated process, but it is actually a simple process. No need to feel intimated.
Cheesecakes and other custard-based products need to be baked in slow, low, evenly distributed heat to get the best results. This is provided by baking your cheesecake on a low temperature and using a water bath during the baking process.
Water baths help reduce the browning process during baking and prevents over-browning during the baking process. Water baths also prevent cracking of the final product.
What Causes Cracking In a Cheesecake?
Not using a water bath properly can cause your cheesecake to crack. Not allowing your cheesecake to completely come to room temperature after baking can cause your cheesecake to crack along with trying to quickly cool down your cheesecake. Not using room temperature ingredients will also lead to a cracked cheesecake.
BE PATIENT WITH YOUR CHEESECAKE. REMEMBER SLOW AND STEADY WINS THE RACE.
Related Article: How To Quickly Change The Yield Of Any Recipe
Building A Water Bath To Prevent Water From Ruining Your Cheesecake?
Alright now let’s get to the point of actually using a water bath in your baking process. Set your oven to 300 degrees Fahrenheit. You will need a 9×13 baking pan along with your springform pan for your cheesecake.
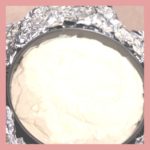
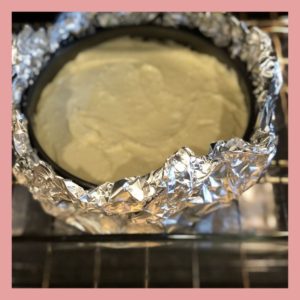
Put your cheesecake crust in your springform pan. Then get out your tinfoil and start creating a protective barrier around your springform pan.
The key to a water bath is preventing water from touching your cheesecake. You are going to do this by creating several layers of a tinfoil barrier around the bottom of your springform pan. Our chef wraps the bottom of her pan 3 to 4 times to prevent water from reaching her cheesecake.
Once you have 3 or 4 layers of tinfoil laid out, then place your springform pan in the certain and push the tinfoil up the sides of the springform pan. Do NOT cover the top of your cheesecake. Just push the tinfoil up the sides. Again, you are trying to prevent the water from reaching your cheesecake.

Then place your springform pan inside the 9X13 baking sheet and put them in the over.
Ok, here is the MOST IMPORTANT part… DO NOT ADD WATER UNTIL YOUR SPRINGFORM PAN AND BAKING PAN ARE IN THE OVEN!!!!!
Yes, I added lots of exclamation points to that because it is so important. If you add the water to the water bath before you put it in the oven, then you run the risk of splashing water into your cheesecake which could ruin your cake.
So once you have your springform pan in your baking pan and both are in the oven, then you can add your water.
Now you are going to fill the baking pan 1/3-1/2 full of warm water. You will not use hot water. Using hot water will scramble the eggs in your cheesecake so remember to use only warm water.
Make sure to not pour water on your cheesecake or into your protective barrier. You are only pouring it into the baking pan.
After Your Cake Is Baked
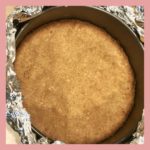
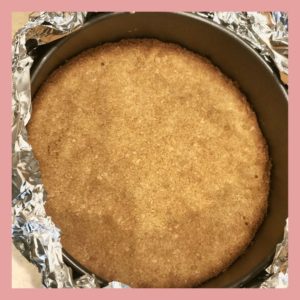
Take your cheesecake out of the oven and remove it completely from the water. If you do not remove it from the water, you will continue to bake your cheesecake.
Next, you will need to let your cheesecake completely come to room temperature. This can take 4-6 hours. Do not try to rush this process and quick-cool your cheesecake. It will crack your cake.
Look at that. Now, you have a beautiful delicious cheesecake that you baked all on your own, and you learned that water baths sound WAY scarier than they actually are.
Did you like this article about how to create a water bath to prevent water from ruining your cheesecake?
If you liked this article about creating water baths for cheesecake, then you need to check out some of our other baking tips articles.
We love helping other bakers improve their skills. Check out our article on the importance of the mixing method [LINK]. In this article we talk about who mixing your ingredients can be as important as the actual ingredients for your final product.
We are not just about improving baking skills, but we are also here to help our fellow entrepreneurs work to grow their own baking businesses especially when they do not have a storefront. Have you thought about starting your own bakery business without a storefront?
That is awesome. We want to help you on your journey. Check our article on how to start your bakery business without a storefront. [LINK]